Hello! Mike on the air 😊
In this tutorial we will create a retro illustration. The design of a typography looks a bit complicated, but in reality it is quite simple and is done in a few short steps. So without further ado let's get down to work.

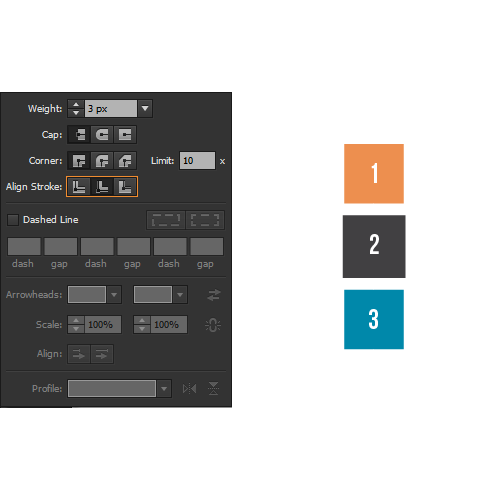
Create a document (425*300px) then create a rectangle 425*300 px of color(1), add a 3px stroke of color(2) and align stroke to inside.
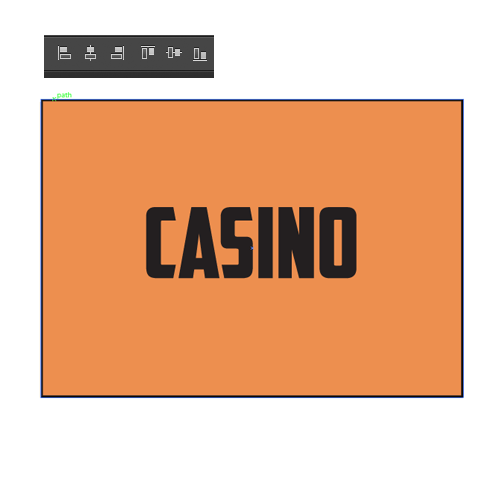
Then we will create typography. I am using font american captain(131 px). Create typography and align it horizontally and vertically to the center.
Now we will make some steps to give our typography a retro-look. First of all make a copy of your type and place it somewhere. It will be needed, if something goes wrong with your main type. Now right click on your type and create outlines. Then go to object -> compound path -> make. Converting to compound path is needed in order to edit all pieces of type simultaneously. By now your type has to have no stroke and no filling at all.

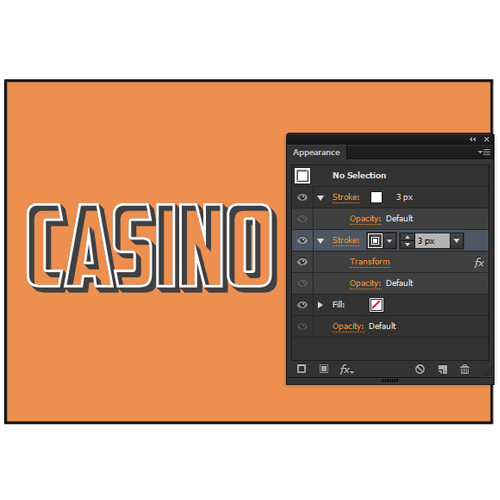
Go to appearance panel, if you can't find it, go to window -> appearance. Set up a 3 px stroke and align it to outside then add another 3 px stroke and place it behind white one. With a black stroke selected go to effects panel -> distort and transform -> transform -> move it 1 px vertically and horizontally then set a number of copies. I use six copies, but I suggest you fiddling with a number of copies as well as with a move panel, in order to understand how the whole system works.

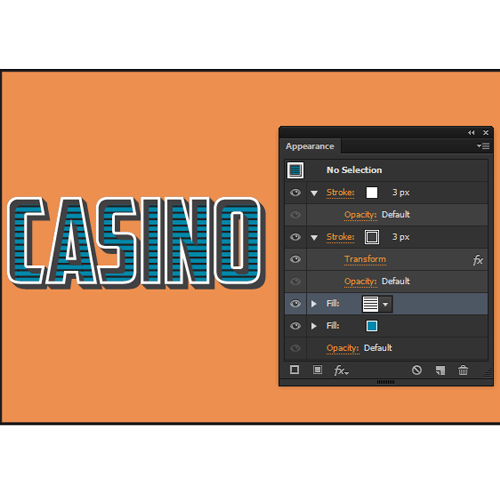
Add a fill of color (3) place it beneath all strokes, add another fill and place it between a black stroke and a blue fill. Go to the icon shown on the picture below and open swatch library -> patterns -> basic graphics -> lines -> choose a pattern with 10lpi and 30% opacity. Now it should look like this:

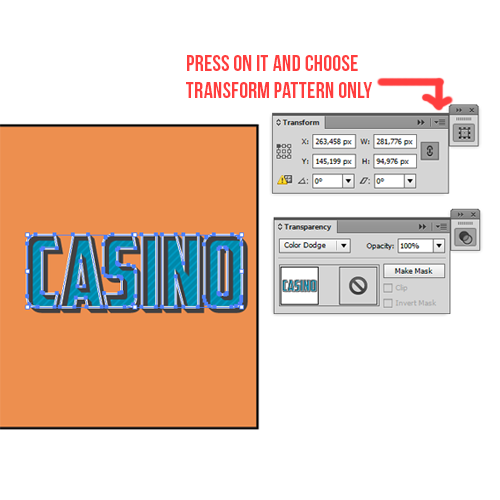
Now with your type being selected and your fill with lines choosen go to window -> and choose transform then select the icon shown on the picture below and use transform pattern only, after that rotate the pattern by 45 degrees. With that made go to window -> transparency and choose color dodge, here it is worth to say that you can play around with opacity and other blend modes to see what happens.
Create a square (150*150 px) align it to the center, then create a horizontall and a verticall line that are aligned to the center and with lines being selected go to view -> guides -> make guides.

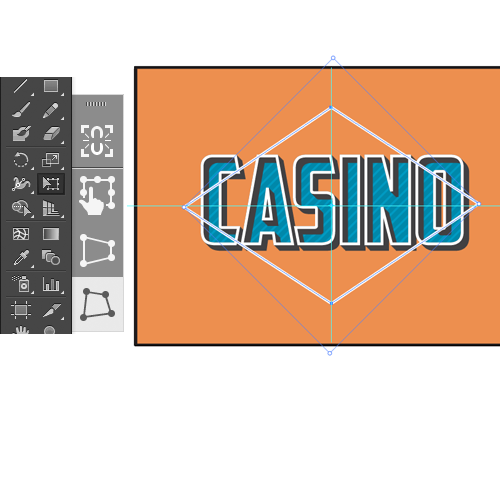
Now select your rectnagle and take free transform tool -> choose free distort, then press on the right corner of your rectangle and with alt button pressed start to drag it to the right, while also tyring to stick to the guidelines. Also if the result doesn't satisfy you, try to mess around with the top and the bottom corner of our square and do to them the same actions that we have done to the right and the left corner. After that place our distorted square behind the typography.
Now create a (133*60 px) rectangle of white color, align it to the center, round top corners by 10 px and place as shown on the image below, also to add a subtle shadow below our rectangle -> copy the rectangle, give it the black color, place it behind the white one and lower the opacity to approximately 30%. Now we will add another piece of typography: choose Bebas Neue font and write whatever phrase you want, align your phrase to the center of the rectangle and give it the color (1) fill.

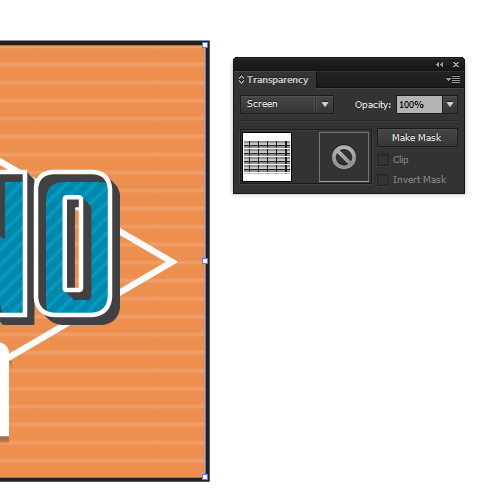
Let's create some lines, so our background doesn't feel to simple. Create a 425*300 px rectangle and fill it with 6lpi 20% lines. The process is similar to the one that we did when we added lined pattern to our piece of type, but now choose screen mode from your transparency panel.
And let's add a finishing touch to our piece of design. Create a star and place it in the top corner of our distorted rectangle. Then with your star seleted go to effect -> distort and transform -> pucker and bloat, then you can play around with the value and choose what you like the most.
So in the end your work should look like this.
Okay guys this part is not related to this particular project, but is very useful while working with graphic style!
A few tricks to remember:
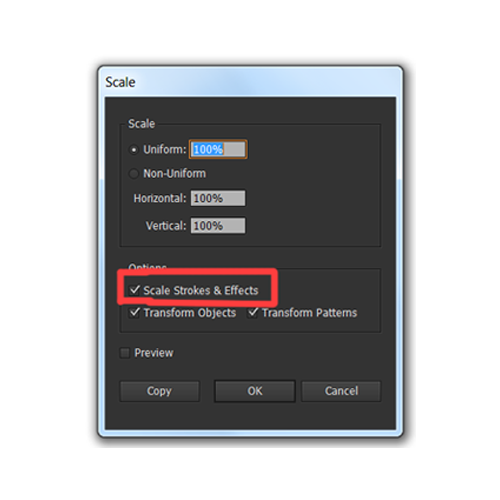
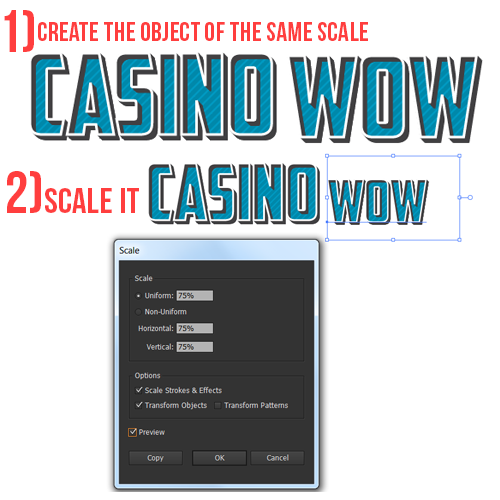
1) To scale your type in the way that don't mess your work completely, right click on the object -> transform -> scale -> scale strokes and effects.
2) Also if you have done all the work with type in appearance panel, you will be able to apply the same effects to another type or object. To do this first of all select your typography and then go to window - graphic styles and choose a small icon at the bottom to add a new graphic style. The problem with adding graphic styles to other objects/typography is that ,if you add the style ,that suits 100px type, to, for example, 50 px typography, the graphic style on the 50 px typography will have the same parameteres, as it have on 100 px type. SO basically the graphic style that suits 100 px type/object will not suit 50px one.

To overcome this problem and add graphic style appropriately to smaller/bigger objects/type you need to create the object/type of the same scale, as the scale of the object/type to which you have applied graphic style previously, and scale it as was shown in trick 1.
Thanks guys for going all the way through this tutorial. I hope it was useful and will come in handy in your future projects. Good luck :)
If you like this article, please leave a comment here or share! You may also thank using referral links → CLICK HERE
In this tutorial we will create a retro illustration. The design of a typography looks a bit complicated, but in reality it is quite simple and is done in a few short steps. So without further ado let's get down to work.
Create a document (425*300px) then create a rectangle 425*300 px of color(1), add a 3px stroke of color(2) and align stroke to inside.
Then we will create typography. I am using font american captain(131 px). Create typography and align it horizontally and vertically to the center.
Now we will make some steps to give our typography a retro-look. First of all make a copy of your type and place it somewhere. It will be needed, if something goes wrong with your main type. Now right click on your type and create outlines. Then go to object -> compound path -> make. Converting to compound path is needed in order to edit all pieces of type simultaneously. By now your type has to have no stroke and no filling at all.
Go to appearance panel, if you can't find it, go to window -> appearance. Set up a 3 px stroke and align it to outside then add another 3 px stroke and place it behind white one. With a black stroke selected go to effects panel -> distort and transform -> transform -> move it 1 px vertically and horizontally then set a number of copies. I use six copies, but I suggest you fiddling with a number of copies as well as with a move panel, in order to understand how the whole system works.
Add a fill of color (3) place it beneath all strokes, add another fill and place it between a black stroke and a blue fill. Go to the icon shown on the picture below and open swatch library -> patterns -> basic graphics -> lines -> choose a pattern with 10lpi and 30% opacity. Now it should look like this:
Now with your type being selected and your fill with lines choosen go to window -> and choose transform then select the icon shown on the picture below and use transform pattern only, after that rotate the pattern by 45 degrees. With that made go to window -> transparency and choose color dodge, here it is worth to say that you can play around with opacity and other blend modes to see what happens.
Create a square (150*150 px) align it to the center, then create a horizontall and a verticall line that are aligned to the center and with lines being selected go to view -> guides -> make guides.
Now select your rectnagle and take free transform tool -> choose free distort, then press on the right corner of your rectangle and with alt button pressed start to drag it to the right, while also tyring to stick to the guidelines. Also if the result doesn't satisfy you, try to mess around with the top and the bottom corner of our square and do to them the same actions that we have done to the right and the left corner. After that place our distorted square behind the typography.
Now create a (133*60 px) rectangle of white color, align it to the center, round top corners by 10 px and place as shown on the image below, also to add a subtle shadow below our rectangle -> copy the rectangle, give it the black color, place it behind the white one and lower the opacity to approximately 30%. Now we will add another piece of typography: choose Bebas Neue font and write whatever phrase you want, align your phrase to the center of the rectangle and give it the color (1) fill.
Let's create some lines, so our background doesn't feel to simple. Create a 425*300 px rectangle and fill it with 6lpi 20% lines. The process is similar to the one that we did when we added lined pattern to our piece of type, but now choose screen mode from your transparency panel.
And let's add a finishing touch to our piece of design. Create a star and place it in the top corner of our distorted rectangle. Then with your star seleted go to effect -> distort and transform -> pucker and bloat, then you can play around with the value and choose what you like the most.
So in the end your work should look like this.
Okay guys this part is not related to this particular project, but is very useful while working with graphic style!
A few tricks to remember:
1) To scale your type in the way that don't mess your work completely, right click on the object -> transform -> scale -> scale strokes and effects.
2) Also if you have done all the work with type in appearance panel, you will be able to apply the same effects to another type or object. To do this first of all select your typography and then go to window - graphic styles and choose a small icon at the bottom to add a new graphic style. The problem with adding graphic styles to other objects/typography is that ,if you add the style ,that suits 100px type, to, for example, 50 px typography, the graphic style on the 50 px typography will have the same parameteres, as it have on 100 px type. SO basically the graphic style that suits 100 px type/object will not suit 50px one.
To overcome this problem and add graphic style appropriately to smaller/bigger objects/type you need to create the object/type of the same scale, as the scale of the object/type to which you have applied graphic style previously, and scale it as was shown in trick 1.
Thanks guys for going all the way through this tutorial. I hope it was useful and will come in handy in your future projects. Good luck :)
If you like this article, please leave a comment here or share! You may also thank using referral links → CLICK HERE
Its wonderful as your other articles :D, thanks for posting.
ReplyDeleteHi just wanted to give you a quick heads up and let you know a few of the
ReplyDeletepictures aren't loading correctly. I'm not sure why but I think its
a linking issue. I've tried it in two different browsers and both show the same
results.