How to Draw a Rainbow in Adobe Illustrator

Hello! New useful trick for Adobe Illustrator is ready.
See all tips and tricks by this link → CLICK HERE

Do you know how to make a rainbow in Adobe Illustrator? It's easy! Just apply a Gradient to a Stroke and rainbow is ready.
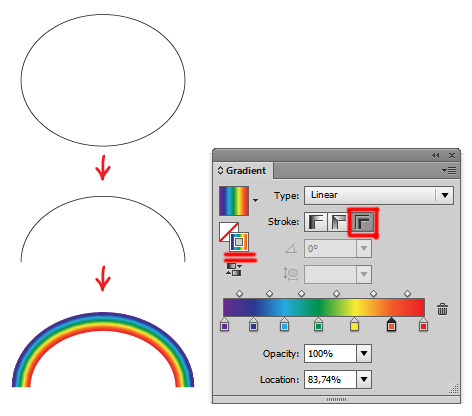


1. Make the ellipse.
2. Cut in half with Scissors Tool (C).
3. Apply the Linear Gradient to a stroke with rainbow colors.

You should make the stroke thicker. And you can use Width Tool (Shift+W) to get the perspective rainbow.
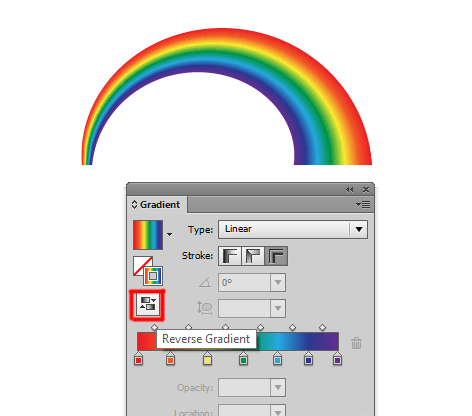


You can change order of the colors with Reverse Gradient by the way.


If you like this article, please leave a comment here or share!
You may also thank me using referral links → CLICK HERE

Comments

  1. I just couldn't depart your website prior to suggesting that I actually loved the standard info an individual provide
    for your visitors? Is gonna be back often to check out new posts

    ReplyDelete

Post a Comment

Popular posts from this blog

Free Scripts for Adobe Illustrator

There are ten very useful and interesting scripts for Adobe Illustrator. You can download them in this set. Just click on the title of the script or picture below. Wish you great creative experiments :) Drag and drop the script file (JSX or JS) to the script folder of your Adobe Illustrator to install the script. Location of the script folder depends on your Adobe Illustrator version and system configuration. For Windows: C → Program Files → Adobe → Adobe Illustrator (your version) → Presets → en_GB → Scripts For Macintosh: Applications → Adobe → Adobe Illustrator (your version) → Presets → en_GB → Scripts Then run Adobe Illustrator. You can find the script in the main menu File → Scripts . You can also run the script without installation. Go to File → Scripts → Other Script (Ctrl+F12) . Then open the script file on your computer. Let's go! Free Stock Master Free Stock Master is a script for Adobe Illustrator which automatically prepares vector files for micr

How to Make a Blurred Vector Background in Adobe Illustrator

There are many ways to make a blurred background in Adobe Photoshop. But this will be a bitmap image. So we should use Adobe Illustrator to get 100% vector picture. Raster effects are not allowed too. You will learn all the secrets of the blurred background in Adobe Illustrator from this tutorial. I'll show you 4 ways to make a blurred background in Adobe Illustrator. The final image will not contain any raster effects or parts. 100% vector illustration. So you can sell such illustrations on Shutterstock or other microstocks. Let's go! 1. Using Mesh to Create Blurred Background First of all you need a source file for your blurred background. You can use a photo for example. I took the photo from my India journey. Drag and drop your photo to the Illustrator window. You can use Illustrator menu File > Place too. Select the photo and go Object > Create Gradient Mesh . Set checkbox Preview and settings for Rows and Columns . You should click OK bu

Adobe Illustrator Tutorial: How to Draw Vinyl Record

In today’s tutorial you will learn how to create a retro vinyl record with the help of the conical gradient. We will use the Apply gradient along stroke function for this. You can find all Illustrator tutorials from this blog using this link → CLICK HERE First of all we should create two circles. Use the Ellipse Tool (L) . Turn off the Fill. Then increase the stroke width of these circles as in the picture below. Select the inner circle. Move the Fill to the top position in the Fill panel. Then apply the Radial Gradient (Ctrl+F9) to the stroke. You need to enable the Apply gradient along stroke option. Do the same for the second circle. Change gradient colors slightly. Then make the central part of the vinyl. Draw another circle. The hole on the vinyl is also a circle. And one more black circle in the background. Now draw two circles with a white stroke - 0,25 pt Weight. Select circles and go to the menu Object > Blend > Make . Then go Object