In this tutorial you will learn how to draw a winter snowy background in Adobe Illustrator. All you’ll need are simple shapes to make snowflakes and Symbols panel.
You can find all Illustrator tutorials from my blog here → Ai tutorials

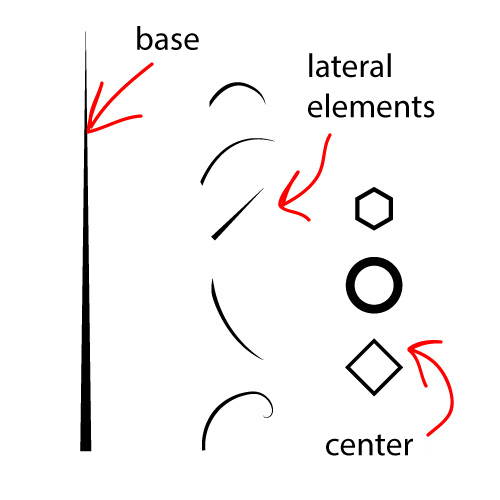
First of all you should create several components for your snowflakes. Use basic shapes for it. See the picture below. It is my kit for the snowflakes.
Now you need to make a reflection of the side elements. Use the right click > Transform > Reflect for it.

You should get such objects after reflections.

Attach the side elements to the base. Use the Align panel for centering. Group objects for convenience.

Making snowflakes. Attach the components to the center. Use right click > Transform > Reflect for copy again.

Then make rotation by the right click > Transform > Rotate. Set angle 45 degrees and click Copy.

You should get the result as in the picture.

Next press Ctrl+D two times to finish the snowflake.

You can delete some extra parts or add any elements.

Create several snowflakes using such technique.

Background is a square with gradient fill. You can do the same. Then drag and drop snowflakes to the Symbols panel (Shift+Ctrl+F11) one by one.

Now you can use Symbol Sprayer Tool (Shift+S) to scatter the snowflakes on the Artboard. Additional tools in the Symbol Sprayer Tool allow you to resize, move and other transformations for the snowflakes.

I made a new layer for another kind of snowflakes. Layers are very convenient. Use this in your illustrations.

Add small circles using the same technique. Now it looks like a snow.

Create several circles with black and white radial gradient fill.

Then use Screen or Color Dodge blending mode in the Transparency panel for light effects.
Here is how it should look. Don't know how to crop your artwork in Adobe Illustrator. You can use Super Magic Eraser script. All symbols must be expanded before running the script (Object > Expand).
I hope you’ve enjoyed this tutorial and can apply these techniques to your future projects.
If you like this article, please leave a comment here or share! You may also thank me using referral links → CLICK HERE
You can find all Illustrator tutorials from my blog here → Ai tutorials
First of all you should create several components for your snowflakes. Use basic shapes for it. See the picture below. It is my kit for the snowflakes.
Now you need to make a reflection of the side elements. Use the right click > Transform > Reflect for it.
You should get such objects after reflections.
Attach the side elements to the base. Use the Align panel for centering. Group objects for convenience.
Making snowflakes. Attach the components to the center. Use right click > Transform > Reflect for copy again.
Then make rotation by the right click > Transform > Rotate. Set angle 45 degrees and click Copy.
You should get the result as in the picture.
Next press Ctrl+D two times to finish the snowflake.
You can delete some extra parts or add any elements.
Create several snowflakes using such technique.
Background is a square with gradient fill. You can do the same. Then drag and drop snowflakes to the Symbols panel (Shift+Ctrl+F11) one by one.
Now you can use Symbol Sprayer Tool (Shift+S) to scatter the snowflakes on the Artboard. Additional tools in the Symbol Sprayer Tool allow you to resize, move and other transformations for the snowflakes.
I made a new layer for another kind of snowflakes. Layers are very convenient. Use this in your illustrations.
Add small circles using the same technique. Now it looks like a snow.
Create several circles with black and white radial gradient fill.
Then use Screen or Color Dodge blending mode in the Transparency panel for light effects.
Here is how it should look. Don't know how to crop your artwork in Adobe Illustrator. You can use Super Magic Eraser script. All symbols must be expanded before running the script (Object > Expand).
I hope you’ve enjoyed this tutorial and can apply these techniques to your future projects.
If you like this article, please leave a comment here or share! You may also thank me using referral links → CLICK HERE
I was reading your article and wondered if you had considered creating an ebook on this subject. Your writing would sell it fast. You have a lot of writing talent. How to make a Coffee Cup in Adobe Illustrator
ReplyDelete