Hi everyone! This is a tutorial for beginners in Adobe Illustrator. We will draw a cute girl character using simple shapes. There aren't any intricate techniques. Finally we will create an illustration in a flat style.

Take the Ellipse Tool (L) and draw an ellipse without stroke. Use a beige fill. You can find some samples in the Window > Swatch Libraries > Skintones.

We need more ellipses :)
You can see that the eyes and nostrils are ellipses too. Copy shapes. Move objects by Selection Tool (V) and hold Alt to get copies.

Now copy head shape (Ctrl+C and Ctrl+V). Pick black color for the fill.

Then make another copy. I use gray color for it.

Select both ellipses and click Minus Front in the PathFinder panel. The smile is ready :)

You should move the smile to the face now.

Draw the ellipse with brown fill. Send it to back (Object > Arrange > Send to Back).

Take the Direct Selection Tool (A) and select top anchor point. Move it down slightly.

Finishing the hairstyle. Add another one ellipse with brown fill. You can use the Eyedropper Tool (I) to copy colors.

Then take the Rectangle Tool (M) and draw the rectangle. This will be the neck.

It's time for a dress. Take the Polygon Tool and click on the Artboard to get options. Set 3 sides and press the OK button to create the triangle.

The triangle needs to be flattened a little. And use Knife Tool to cut off the top. Hold the Shift button and the incision will be straight. We have a trapezoid now. Use it as a dress.

Create hands. Select hair and copy (Ctrl+C). Put a copy under the dress and change color.

Take the Pen Tool (P) and click to the bottom point to delete it. Looks much better.

Next draw two rectangles for legs.

Draw the ellipse and cut it in half by the Knife Tool. Now we have shoes.

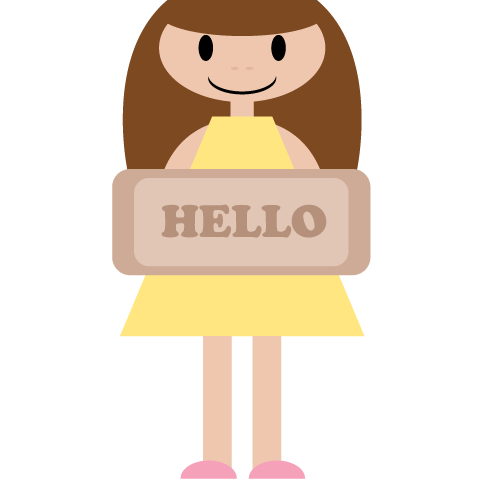
Take the Rounded Rectangle Tool and draw the rectangle. This will be a sign.

Ctrl+C and Ctrl+F to copy and paste the rectangle. Make the size smaller and recolor it.

Use the Type Tool (T) to add any text.
And we need many more ellipses for her fingers.

Pretty! The best part of beauty is that which no picture can express.
And you can see that the girl is a symmetrical image. Use the Align (Shift+F7) panel if some objects are uneven. You can try Live Mirror Templates for symmetrical drawing also.
If you like this article, please leave a comment here or share! You may also thank me using referral links → CLICK HERE
Take the Ellipse Tool (L) and draw an ellipse without stroke. Use a beige fill. You can find some samples in the Window > Swatch Libraries > Skintones.
We need more ellipses :)
You can see that the eyes and nostrils are ellipses too. Copy shapes. Move objects by Selection Tool (V) and hold Alt to get copies.
Now copy head shape (Ctrl+C and Ctrl+V). Pick black color for the fill.
Then make another copy. I use gray color for it.
Select both ellipses and click Minus Front in the PathFinder panel. The smile is ready :)
You should move the smile to the face now.
Draw the ellipse with brown fill. Send it to back (Object > Arrange > Send to Back).
Take the Direct Selection Tool (A) and select top anchor point. Move it down slightly.
Finishing the hairstyle. Add another one ellipse with brown fill. You can use the Eyedropper Tool (I) to copy colors.
Then take the Rectangle Tool (M) and draw the rectangle. This will be the neck.
It's time for a dress. Take the Polygon Tool and click on the Artboard to get options. Set 3 sides and press the OK button to create the triangle.
The triangle needs to be flattened a little. And use Knife Tool to cut off the top. Hold the Shift button and the incision will be straight. We have a trapezoid now. Use it as a dress.
Create hands. Select hair and copy (Ctrl+C). Put a copy under the dress and change color.
Take the Pen Tool (P) and click to the bottom point to delete it. Looks much better.
Next draw two rectangles for legs.
Draw the ellipse and cut it in half by the Knife Tool. Now we have shoes.
Take the Rounded Rectangle Tool and draw the rectangle. This will be a sign.
Ctrl+C and Ctrl+F to copy and paste the rectangle. Make the size smaller and recolor it.
Use the Type Tool (T) to add any text.
And we need many more ellipses for her fingers.
Pretty! The best part of beauty is that which no picture can express.
And you can see that the girl is a symmetrical image. Use the Align (Shift+F7) panel if some objects are uneven. You can try Live Mirror Templates for symmetrical drawing also.
If you like this article, please leave a comment here or share! You may also thank me using referral links → CLICK HERE
Comments
Post a Comment