
How to Prepare and Save Vector Files for Microstocks

Hello everybody! This is a very useful article for beginners on microstocks. You will learn how to prepare and save vector files in Adobe Illustrator. There are technical requirements for illustrations on microstocks. Vector illustrations with errors will be rejected.

Technical requirements

1. EPS-10 or 8 format for vector file.
2. JPEG preview of vector file (about 25 megapixels).
3. No open paths, isolated points, unpainted objects.
4. No Symbol Instances.
5. No Type Objects, Pattern Objects, Brushed Objects, Styled Objects.
6. No Linked Images and Embedded Images.
7. No Effects.
8. No objects outside the Artboard.

You can inspect your vector file using the Document Info panel
(Window > Document Info).


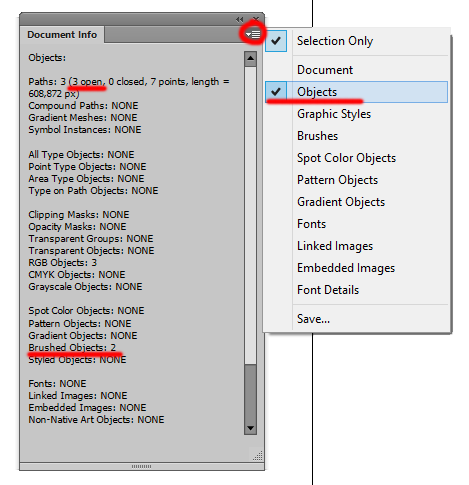
Select all (Ctrl+A) and set the Objects in the settings. Now you can see all the information about your illustration.

3 open paths and 2 brushes in this example. Such mistakes must be corrected in the file for microstock. You can use Stock Master script to fix mistakes. Also this script will save all files for microstocks.


If you like this article, please leave a comment here or share! You may also thank me using referral links → CLICK HERE

[Ru]

Comments

  1. Next time I read a blog, Hopefully it won't disappoint me as much as this one.
    I mean, Yes, it was my choice to read, nonetheless I genuinely thought you
    would have something interesting to say. All I hear is a bunch of whining about something that you
    can fix if you were not too busy seeking attention.

    ReplyDelete

Post a Comment

Popular posts from this blog

Free Scripts for Adobe Illustrator

There are ten very useful and interesting scripts for Adobe Illustrator. You can download them in this set. Just click on the title of the script or picture below. Wish you great creative experiments :) Drag and drop the script file (JSX or JS) to the script folder of your Adobe Illustrator to install the script. Location of the script folder depends on your Adobe Illustrator version and system configuration. For Windows: C → Program Files → Adobe → Adobe Illustrator (your version) → Presets → en_GB → Scripts For Macintosh: Applications → Adobe → Adobe Illustrator (your version) → Presets → en_GB → Scripts Then run Adobe Illustrator. You can find the script in the main menu File → Scripts . You can also run the script without installation. Go to File → Scripts → Other Script (Ctrl+F12) . Then open the script file on your computer. Let's go! Free Stock Master Free Stock Master is a script for Adobe Illustrator which automatically prepares vector files for micr

How to Make a Blurred Vector Background in Adobe Illustrator

There are many ways to make a blurred background in Adobe Photoshop. But this will be a bitmap image. So we should use Adobe Illustrator to get 100% vector picture. Raster effects are not allowed too. You will learn all the secrets of the blurred background in Adobe Illustrator from this tutorial. I'll show you 4 ways to make a blurred background in Adobe Illustrator. The final image will not contain any raster effects or parts. 100% vector illustration. So you can sell such illustrations on Shutterstock or other microstocks. Let's go! 1. Using Mesh to Create Blurred Background First of all you need a source file for your blurred background. You can use a photo for example. I took the photo from my India journey. Drag and drop your photo to the Illustrator window. You can use Illustrator menu File > Place too. Select the photo and go Object > Create Gradient Mesh . Set checkbox Preview and settings for Rows and Columns . You should click OK bu

Adobe Illustrator Tutorial: How to Draw Vinyl Record

In today’s tutorial you will learn how to create a retro vinyl record with the help of the conical gradient. We will use the Apply gradient along stroke function for this. You can find all Illustrator tutorials from this blog using this link → CLICK HERE First of all we should create two circles. Use the Ellipse Tool (L) . Turn off the Fill. Then increase the stroke width of these circles as in the picture below. Select the inner circle. Move the Fill to the top position in the Fill panel. Then apply the Radial Gradient (Ctrl+F9) to the stroke. You need to enable the Apply gradient along stroke option. Do the same for the second circle. Change gradient colors slightly. Then make the central part of the vinyl. Draw another circle. The hole on the vinyl is also a circle. And one more black circle in the background. Now draw two circles with a white stroke - 0,25 pt Weight. Select circles and go to the menu Object > Blend > Make . Then go Object